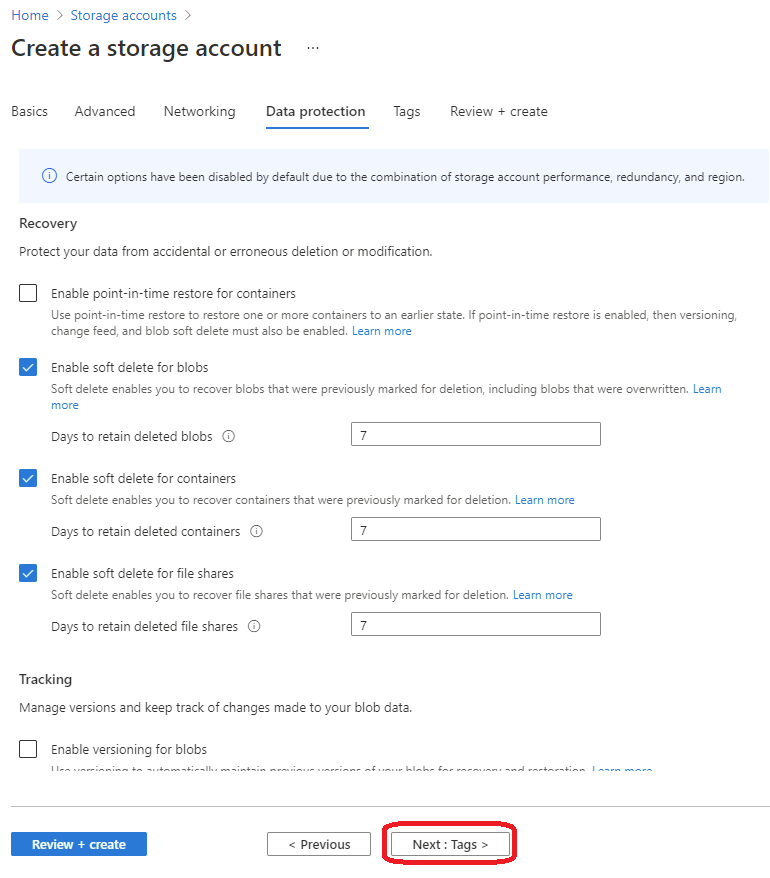
How to Backup Windows 365 Cloud PC?

Microsoft is planning a revolution in remote work with its new Windows 365 cloud service, but what exactly are Windows 365 Cloud PC and backup the Cloud PC process.

What is windows 365 Cloud PC?

It’s a cloud computing platform that offers virtual PCs with Windows 10 or 11 installed that are quick and easy to set up.

Need Windows 365 Cloud PC backup? What software can I reference?

Veeam Agent for Microsoft Windows is a data protection and disaster recovery solution for physical and virtual machines. Veeam Agent for Microsoft Windows can be used to protect different types of computers and devices: desktops, laptops, and tablets.

Create an Azure file share and storage account

To create a storage account via the Azure portal, select + Create a resource from the dashboard. In the resulting Azure Marketplace search window, search for storage account and select the resulting search result. This will lead to an overview page for storage accounts; select Create to proceed with the storage account creation wizard.

The first section to complete to create a storage account is labeled Basics. This contains all of the required fields to create a storage account.

Networking

The networking section allows you to configure networking options. These settings are optional for the creation of the storage account and can be configured later if desired. 

Data protection

The data protection section allows you to configure the soft-delete policy for Azure file shares in your storage account. Other settings related to soft-delete for blobs, containers, point-in-time restore for containers, versioning, and change feed apply only to Azure Blob storage.

Review + create

The final step to create the storage account is to select the Create button on the Review + create tab. This button won’t be available if all of the required fields for a storage account are not filled.

On the main storage account page, select File shares select the tile labeled File shares (you can also navigate to File shares via the table of contents for the storage account).

Configuring Veeam Backup Agent for Windows

It will ask to install a license file, click No and then “Add new job”. The wizard will open.

First you need to specify the name of the job and click Next. After that we need to select the backup type. In our example I will make a full backup of Volume level backup.

Click Next and chose the Volumes destination, in this example we will make a backup to Operating System.

Click Next and chose the backup destination, in this example we will make a backup to shared folder.

Shared folder: \\azurewindow365veeam.file.core.windows.net\azurepcbackup

UserName: Azure\azurewindow365veeam

Now we need to setup the Schedule, in this example I will make schedule backup for everyday. So, I check the daily option.

Click Apply, check the summary and click Finish.

The backup will begin shortly, and we can check full its status by clicking on the job and then on “Processing

After job is complete, we can view our Windows 365 Cloud PC backup on our Azure File Shares

Now that we have our Azure File Share created, lets move onto the VBR 11 setup. Log into your VBR server. Select File Shares -> Add SMB File Share. Copy your file share details from your Azure Portal. Specify access credentials. Specify File proxy and Cache Repository. Apply settings.

Your File Share should have been successfully added to our VBR console. Next up we will need to create the Backup Job.

Create a File Share Backup Job and Backup Name.

Add your File Share path from the Microsoft Azure. 

Specify Repositories and Retention periods.

 Confirm the Schedule. 

Confirm all the details are correct and complete the setup.

At this point you should see your Backup Job in Veeam ready to be initiated. Once you have run the job, confirm that it completes successfully as below.

Restore the File Share

Select Restore individual files and folders

As with all data protection scenarios, backup is only worth its weight if it can be restored. With that in mind, lets kick off a restore to confirm all our files have been backed up.

Restore Windows 365 Cloud PC file and folders

Import Azure File Shares Backup images 

Select Guest Files (Windows)

Select the Restore Point

Looks good to me! As you can see above, the File Share has been backed up successfully and is ready to be restored.